Cart0
you have not items in your shopping cart.

Ursprünglicher Preis war: 1.999,00 €1.899,00 €Aktueller Preis ist: 1.899,00 €.
source of emotions
Nicht vorrätig
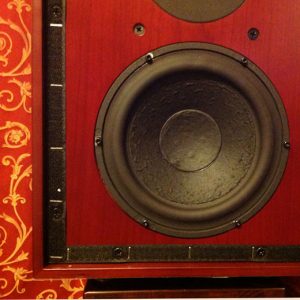
Rogers LS3/5a Speaker Monitor 65th Anniversary Edition
Standmount Speaker
Iconic and Timeless Design
Worldwide Acclaim
Multiple Award Winner
Beautiful Construction
2-way Configuration
Thank you for choosing to purchase Rogers loudspeakers. We are confident that these loudspeakers will provide you with high quality sound and music reproduction for many years.
Please read the short section of this manual headed ‚Quick Installation’. It contains essential information to enable you to get your speakers up and running safely.
To obtain the maximum performance and benefit your new speakers can bring, please take time to read the remainder of this manual and to familiar yourself with the speakers. You will find the rest of this manual contains helpful advice on connecting-up, matching equipment, room placement and maintenance.
In 1947, an armed forces communications engineer turned his expertise to audio amplifiers. Jim Rogers took up a license to produce the Williams mono valve amplifier thus founding the company.
In the early years Rogers was best known for its amplification products but by 1954 could boast a complete ‚Junior‘ system comprising amplifier, AM tuner and compact loudspeakers. The 1960s were dominated by the launch of stereo and the Rogers stereo ‚Cadet‘ integrated amplifier become a world best seller.
Loudspeaker development at Rogers included unique horn-loaded designs, and even a wall hanging system called the ’Wafer1 that was well ahead of the times. The transistor revolutionized the entire communications / entertainment world and Rogers was on of the first manufacturers to offer transistor products including the famous Ravensboume and Ravensbrook stereo amplifiers and tuners.
Transistor amplifiers offered ever more power and the focus of development passed to loudspeaker materials prompting the BBC to begin extensive research into monitor speakers for studio use. Fundamental acoustic research and scaling techniques produced the compact LS3/5a that become a benchmark product used throughout the broadcast industry in a wide variety of monitoring situations. Rogers took up a license to produce the LS3/5a and began to produce speakers of its own using the latest polymer materials derived from BBC research. Still innovating, Rogers now uses the world’s first carbon fibre dome tweeter.
In 21st century, Rogers has been continuing its spirit in developing the high-end audio product to reproduce the most natural sound reflecting every details of the original recordings. To celebrate the sixties history, Rogers specially works with BBC again to launch the new LS3/5a limited edition to satisfy the needs of the global audiophiles.
Unpack your loudspeakers carefully and retain the packing for possible future use.
Position you speakers approximately where you want them and select cable runs of appropriate length.
Switch off the amplifier. Check the Bi-wire links are in place between the terminal on the rear of each speaker. Deal with each channel separately. Identify the left speaker of the pair as the speaker on the left when viewed from the listening positions.
Connect the black terminal on the amplifier left channel (possible marked ‚ negative‘ or with a symbol) to the black terminal on the left loudspeaker. Connect the red terminal on the amplifier left channel (possibly marked positive or with a ‚+‘ symbol) to the red terminal on the left loudspeaker. Make the connections to the upper pair of terminals marked HF.
Repeat these connections for the right channel. Check the integrity of the connections and that there are no shorted wires. Turn down the volume and switch on the amplifier. Select a known source and turn up the volume cautiously.
Details of how to check for phase and polarity, channel identification and the benefits of bi-wiring and bi-amping can be found later in this booklet.
Always unpack speakers with care so as not to damage the finish. It is always advisable to open the packaging at one end, invert the carton with the open flaps folded back so the loudspeaker is standing on the floor. Then remove the packaging from the loudspeaker. Care should be taken with larger or heavier models to avoid back or muscle strain. Get someone to help you if you are in any doubt. Retain all the packaging materials in case you need to transport the speakers later.
Cables
Connecting cables have an important effect on final sound quality. Similar lengths of good quality speaker cable should be used. Your dealer can advise you of suitable cables for your installation. Longer cable runs will generally require heavier gauge cables.
All system connections should be clean and tight. Cleaning of all signal path connections in your system is recommended annually. Simply breaking and remaking each connection ensuring a positive contact is all that is needed.
Conventional wiring
Switch off the amplifier. Never make or break any connection with the amplifier powered or with the volume turned up.
Leave the Bi-wire links fitted between the input terminals in place. Take each channel separately to avoid confusion. First, identify the amplifier left channel. You will be connecting these terminals to the left loudspeaker, this is the speaker on the left as seen from the chosen listening position.
HF: High Frequency LF: Low Frequency

Connect the black terminal on the amplifier left channel (possibly marked ’negative‘ or with a ‚-‚ symbol) to the black terminal on the left loudspeaker. Make the connections to the upper pair of terminals marked HF. Your speaker cable maybe ribbed or overprinted along on conductor to help with wiring up. Now connect the red terminal on the amplifier left channel (possibly marked ‚positive‘ or with a ‚+‘ symbol) to the red terminal on the left loudspeaker. Repeat this process for the right channel with the second length of cable. Refer to the diagrams.
Bi-wiring
Rogers loudspeakers feature split crossovers to allow for bi-wiring. This can improve the overall sound quality for the cost of a second set of cables. Bi-wiring keeps the low frequency ground currents from modulating the higher frequency signals int he trebles ‚leg‘ of the crossover network. The split crossover design permits the mid/treble and bass sections to be fed separately.
Two lengths of four-core bi-wire cable or additional lengths of your existing cable are required.
HF: High Frequency LF : Low Frequency

Switch off the amplifier. You may find it helpful to label the cables before starting to wire up the system. Label one pair of cables HF and one pair LF. Remove the Bi-wire links from between the speaker terminals and store them in case you wish to revert to conventional wiring at any point in the future.
Take each channel separately. Connect the black terminal on the amplifier left channel (possibly market ’negative‘ or with a ‚-‚ symbol) to the black HF terminal on the left loudspeaker. Make certain your connection is to the upper pair of terminals market HF. Your speaker cable maybe ribbed or over-printed along one conductor to help with wiring up. Now connect the red terminal on the amplifier left channel (possibly marked ‚positive‘ or with a ‚+‘ symbol) to the red HF terminal on the left loudspeaker.
Repeat this process for the cable pair you have marked LF connecting the same amplifier terminals but making the connections on the left speaker to the lower pair of terminals also market LF. Refer to the diagrams.
Repeat for the HF and LF right channel connections.
Bi-amping
Bi-amping uses separate full bandwidth power amplifier to drive the separate HF (high frequency) and LF (low frequency) legs of the crossover network and appropriate drivers.
Two lengths of four-core bi-wire cable or additional lengths of your existing cable are required.
HF: High Frequency
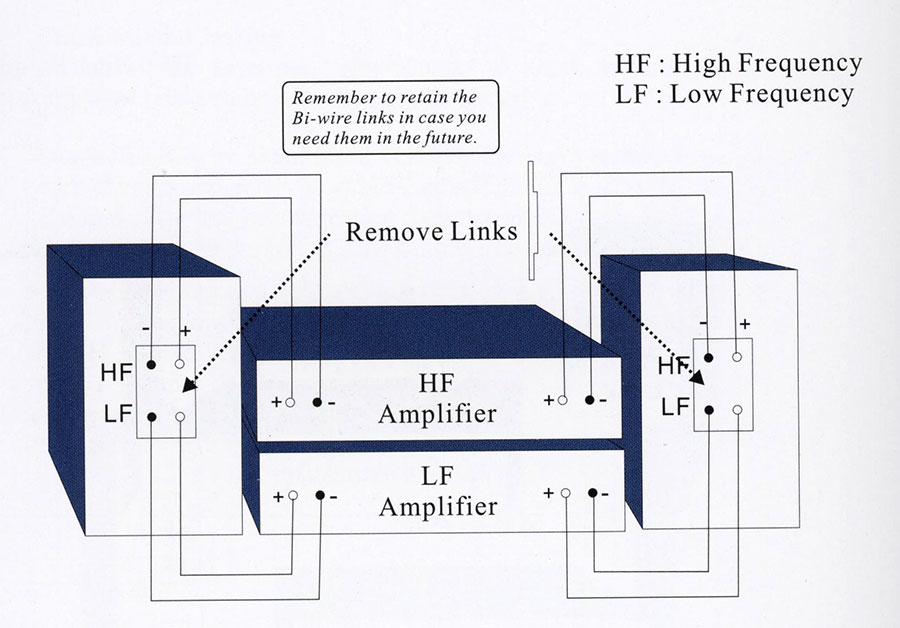
Switch off the amplifier. You may find it helpful to label the cables and power amplifiers before starting to wire up the system. Label one pair of cables HF and one pair LF. Remove the shorting links from between the speaker terminals and store them in case you wish to revert to conventional wiring at any point in the future. Designate one amplifier High (HF) and one Low (LF).
Take each channel separately. Connect the black terminal on the HF amplifier left channel (possibly marked ’negative‘ or with a ‚-‚ symbol) to the black HF terminal on the left loudspeaker. Make certain your connection is to the upper pair of terminals marked HF. Your speaker cable may be ribbed or over-printed along one conductor to help with wiring up. Now connect the red terminal on the HF amplifier left channel (possible marked ‚positive‘ or with a ‚+‘ symbol) to the red HF terminal on the left loudspeaker.
It is easier at this stage to wire up the right channel for the HF amplifier connecting the black terminal on the HF amplifier right channel (possibly marked ’negative‘ or with a symbol) to the black HF terminal on the right loudspeaker. Then connect the red terminal on the HF amplifier right channel (possibly marked ‚positive‘ or with a ‚+‘ symbol) to the red HF terminal on the right loudspeaker.
Repeat these four connections using the cable pair you have marked LF connecting the left and right LF amplifier terminals to the lower pair of terminals, also marked LF, on the left and right speakers. Refer to the diagrams.
Rogers speakers are designed to present an easy load to the amplifier and, to make the most of the power available, they are efficient enough to produce reasonable sound pressure levels even with lower powered amplifiers.
Because our drive units and crossover networks are conservatively rated and constructed using the latest high technology materials the finished speaker has very high technology materials the finished speaker has very high-power handling capabilities. The recommended amplifier range reflects this lower efficiency and upper power handling limits in offering a range of powers that will suit each model. Room size will influence choice. Installations in larger rooms will require amplifiers from the upper end of the range to produce wholly satisfactory sound levels, while in small rooms an amplifier near the minimum recommended power rating will be able to produce adequate volumes.
Loudspeakers are rarely damaged by being overdriven by large amplifiers, a low powered amplifier used at a high volume setting is much more likely to damage your loudspeakers due to the amplifier ‚clipping‘ the music signal and creating a ’spray‘ of high level, high frequency distortion that can rapidly bum out a tweeter or midrange driver voice coil. It is preferable to use a 200 watt amplifier cautiously at half power into 100 watt rated loudspeakers than it is to run a 50 watt amplifier at full volume into the same speakers.
It is important to observe the correct polarity when you wire up your system. There are two areas of concern – channel identification and phase.
Correct channel connections should ensure that the left amplifier channel is connected to the left speaker (the speaker on the left as seen from the listening position). A test CD, record or tape can be used to identify the correct channels.
It is recommended that you connect positive terminals on the amplifier to positive terminals on the speaker, ie. red to red and black to black. Reversing the connections on both channels achieves a reversal in absolute phase. This may mean that the speaker bass cone moves backwards rather than forwards on the transient or beginning of a bass note. Come listeners are sensitive to this effect. You should note that absolute phase will differ from recording to recording and sometimes between amplifiers. You may wish to experiment.
The correct frequency response (tonal balance) is achieved from your loudspeakers with their grilles in place. Removal of the grilles will compromise high and mid frequency performance.
Loudspeakers should never be placed tightly in the comers of rooms. Though this dramatically increases the bass in one frequency band, it produces a cancellation ’suck-ouf in the next. Though certain types of music may be artificially enhanced, the effect is very unnatural as can be heard in reproduced speech as a ‚boomy‘ or congested quality.
Placing stand mounted speakers on the floor will create a similar effect.
If speakers have to be placed close to the comers of a room they should be place asymmetrically with respect to the two walls, that is at a different distance from the side and rear wall. Careful listening and experimentation with positions can minimize the effects of room reflections on bass reinforcement and cancellation.
Reflections at higher frequencies from any large flat sound-reflecting surface (wall, mirror, furniture) can adversely affect stereo imaging. Soft furnishings and fabrics can be used to change reflections if the speakers can conveniently be repositioned

The real wood veneers used on certain models can be maintained by regular dusting and gentle cleaning with furniture polish and a soft cloth. Over use of waxy polishes may change the colour of the veneers.
The high-quality synthetic veneers chosen for some Rogers loudspeaker systems will retain their appearance for many years if dusted regularly and cleaned periodically with furniture polish. Spray polish onto the cloth. Do not spray polish onto the loudspeaker as this may damage the drive units.
Grille cloth is best kept clean with a length of sticky tape wrapped around the hand adhesive side out or with a clean soft brush. Do not use undue pressure as you may damage the drive units beneath the grille.
Rogers loudspeakers should not be connected to any amplifier which exceeds the recommended amplifier requirements, as stated within the individual model specifications.
| Weight | 12 kg |
|---|---|
| Dimensions | 60 × 40 × 55 cm |
Allgemeine Geschäftsbedingungen (nachfolgend AGB genannt) der BesteMusik und dem rogershifi.de , im folgenden BesteMusik und rogershifi.de genannt.
(Stand: Mai 2017)
Die nachstehenden Geschäftsbedingungen gelten für alle elektronisch, telefonisch, persönlich, per Brief oder E-Mail an BesteMusik übermittelten Bestellungen durch Kunden und werden mit jeder Bestellung von den Kunden anerkannt.
Endverbraucher im Sinne dieser Geschäftsbedingungen sind natürliche Personen, mit denen in Geschäftsbeziehungen getreten wird, ohne dass diesen eine gewerbliche, selbständige oder freiberufliche Tätigkeit zugerechnet werden kann. BesteMusik bietet keine Produkte zum Kauf durch Minderjährige an.
Kunden im Sinne dieser Geschäftsbedingungen sind Endverbraucher.
Die Geschäftsbedingungen im BesteMusik Onlineshop gelten für alle Käufe bei BesteMusik music shop, die von Endverbraucher getätigt werden. Endverbraucher im Sinne dieser Geschäftsbedingungen sind natürliche Personen, mit denen in Geschäftsbeziehungen getreten wird, ohne dass diesen eine gewerbliche, selbständige oder freiberufliche Tätigkeit zugerechnet werden kann.
Unternehmer werden gebeten, Bestellungen über andere Kommunikationswege wie Telefon oder E-Mail zu tätigen.
Abweichende, entgegenstehende oder ergänzende AGB werden nicht Vertragsbestandteil, es sei denn, ihre Geltung wird ausdrücklich schriftlich vereinbart. Dem formularmäßigen Hinweis auf Geschäftsbedingungen des Kunden wird widersprochen.
2.1 Vertragsschluss für Endverbraucher im BesteMusik music shop
Mit der Präsentation unserer Waren und der Einräumung der Möglichkeit zur Bestellung ist noch kein verbindliches Angebot unsererseits verbunden. Erst Ihre Bestellung stellt ein Angebot an uns zum Abschluss eines Kaufvertrages dar. Wenn sie eine Bestellung bei uns aufgeben, werden Sie von unserem System insgesamt zweimal aufgefordert Ihre Bestelldaten auf ihre Richtigkeit hin zu prüfen. Nach Beendigung des Bestellvorgangs im BesteMusik music shop, senden wir Ihnen an die von Ihnen angegebene E-Mail-Adresse eine E-Mail mit der Ihrer Bestellung im rogershifi.de zu, in der wir den Eingang Ihrer Bestellung bestätigen, deren Einzelheiten aufführen (Bestellbestätigung) sowie den Rechnungsbetrag, die Rechnung- / Zahlungsart, Anschrift und Versandkosten aufführen. Mit dieser E-Mail ist ein rechtmäßiger Kaufvertrag zustande gekommen.
3.1 Preise und Versandkosten für Endverbraucher im BesteMusik music shop
Die ausgezeichneten Preise im rogershifi.de sind Endpreise inkl. der jeweils gültigen, gesetzlichen Mehrwertsteuer. Es gilt der Betrag der jeweils zum Zeitpunkt der Bestellung ausgewiesen ist. Hinzu kommen Versandkosten, die von der Versandart, Bestellwert sowie Hinsendeland abhängig ist.
Die regelmäßigen Standardkosten der Rücksendung, die im Falle einer Rückgabe der Ware durch Sie in Ausübung Ihres Widerrufsrecht entstehen, trägt der Endverbraucher die unmittelbaren Kosten der Rücksendung der Ware. Bei Ausübung Ihres Widerrufsrechts erstatten wir Ihnen auch die Versandkosten (Hinsendekosten) zurück.
4.1 Zahlung für Endverbraucher im BesteMusik music shop
Die gelieferte Ware verbleibt bis zur vollständigen Zahlung unser Eigentum.
Die Bezahlung erfolgt bei Lieferung innerhalb der Bundesrepublik Deutschland entweder per Nachnahme (zzgl. Nachnahmegebühren), per Vorkasse.
Www.rogershifi.de weist ausdrücklich darauf hin, dass die jeweilige Spedition zur Bezahlung von Nachnahmesendungen nur Bargeld akzeptiert.
Die Bezahlung bei Lieferung im europäischen Ausland erfolgt entweder per Vorkasse.
5.1 Zahlungsverzug bei Endverbraucher im BesteMusik music shop
Kommen Sie in Zahlungsverzug, so ist rogershifi.de berechtigt, Verzugszinsen in Höhe von 6 Prozentpunkten über dem von der Deutschen Bundesbank für den Zeitpunkt der Bestellung bekannt gegebenen Basiszinssatz p.a. zu fordern. Falls Www.rogershifi.de ein höherer Verzugsschaden nachweisbar entstanden ist, ist Www.rogershifi.de berechtigt, diesen geltend zu machen.
Ein Recht zur Aufrechnung steht dem Kunden nur zu, wenn seine Gegenansprüche rechtskräftig festgestellt oder von BesteMusik oder Www.rogershifi.de unbestritten sind. Außerdem ist er zur Ausübung eines Zurückbehaltungsrechts nur insoweit befugt, als sein Gegenanspruch auf dem gleichen Vertragsverhältnis beruht.
7.1 Lieferung und Transport für den Endverbraucher im BesteMusik music shop
7.1.1
Die Lieferung erfolgt an die vom Kunden angegebene Lieferanschrift.
7.1.2
Die bestellten Waren werden im Rahmen der Lieferbarkeit des Artikels durch rogershifi.de nach Geldeingang auf das angegebene Konto von Www.rogershifi.de versendet. Bei Nachnahmesendungen werden die bestellten Waren im Rahmen der Lieferbarkeit des Artikels durch rogershifi.de gleich versendet. Die Zahlung erfolgt an den Spediteur. Wir weisen darauf hin, dass die Spedition nur Barzahlungen akzeptiert.
7.1.3
Es gelten die Lieferkosten, die zum Zeitpunkt der Bestellung des Kunden bei dem jeweiligen Artikel auf der Internetseite angegeben sind. Ab einem Bestellwert von über 50 EUR innerhalb Deutschlands und Österreich übernimmt rogershifi.de die Versandkosten.
7.1.4
Bei einem Warenwert von weniger als 510,00 € wird die Ware innerhalb Deutschlands mit UPS versendet. Innerhalb und ausserhalb der europäischen Gemeinschaft (ausgenommen Deutschland) wird die Ware bis Warenwert 510,00 € entweder per FedEx, Hermes oder UPS versendet.
Ab einem Warenwert von über 510,00 € erfolgt der Versand der Ware innerhalb Deutschlands mit UPS und innerhalb und außerhalb der europäischen Gemeinschaft entweder mit FedEx, Hermes oder UPS. Eventuell anfallende Zuschläge für Zoll und Sondergebiete übernimmt ausschließlich der Endverbraucher.
7.1.5
Sendungen ab 40,00 kg und Sperrgut (Pakete mit einem größeren Volumen als 1 qm) werden in der Regel nicht mit FedEx, Hermes oder UPS, sondern per Spedition geliefert. Www.rogershifi.de weist ausdrücklich darauf hin, dass diese Ware nicht ins Haus getragen wird.
7.1.6
Alle Sendungen werden grundsätzlich bis 500,00 € versichert. Auf schriftlichen Wunsch sichern wir die Ware gegen Berechnung der entstehenden Mehrkosten auch in der von Ihnen gewünschten Höhe ab.
Sollten gelieferte Waren offensichtliche Transportschäden aufweisen, wird der Endverbraucher gebeten, solche Fehler möglichst umgehend gegenüber BesteMusik zu reklamieren. Die Versäumung dieser Rüge hat allerdings für Ihre gesetzlichen Ansprüche und deren Durchsetzung, insbesondere Ihre Gewährleistungsrechte keinerlei Konsequenzen. Sie helfen uns aber, unsere eigenen Ansprüche gegenüber dem Frachtführer bzw. der Transportversicherung geltend machen zu können.
7.1.7
Soweit eine Lieferung an den Kunden nicht möglich ist, weil die gelieferte Ware nicht durch die Eingangstür, Haustür oder den Treppenaufgang des Kunden passt oder weil der Kunde nicht unter der von ihm angegebenen Lieferadresse angetroffen wird, obwohl der Lieferzeitpunkt dem Kunden mit angemessener Frist angekündigt wurde, trägt der Kunde die Kosten für die erfolglose Anlieferung.
7.1.8
Zu Ihrer Sicherheit erfolgt der Versand grundsätzlich in Originalverpackung.
7.1.9
Macht höherer Gewalt (Naturkatastrophen, Krieg, Bürgerkrieg, Terroranschlag) die Lieferung oder eine sonstige Leistung dauerhaft unmöglich, ist eine Leistungspflicht von rogershifi.de ausgeschlossen. Bereits gezahlte Beträge werden von rogershifi.de zurück erstattet.
7.1.10
rogershifi.de kann außerdem die Leistung verweigern, soweit diese einen Aufwand erfordert, der unter Beachtung des Inhalts des Kaufvertrages und der Gebote von Treu und Glauben in einem groben Missverhältnis zu dem Interesse des Kunden an der Erfüllung des Kaufvertrages steht. Bereits gezahlte Beträge werden von rogershifi.de zurück erstattet.
Siehe Widerrufsbelehrung
Alle gelieferten Waren bleiben bis zur vollständigen Bezahlung im Eigentum von BesteMusik.
Das Vorbehaltseigentum erstreckt sich auch auf verarbeitete Gegenstände und im Falle der Weiterveräußerung auf die Kaufpreisforderung (verlängerter Eigentumsvorbehalt).
Solange dieser Eigentumsvorbehalt besteht, darf der Endverbraucher die Ware weder weiterveräußern noch über die Ware verfügen; insbesondere darf der Kunde Dritten vertraglich keine Nutzung an der Ware einräumen.
10.1 Gewährleistung und Haftung für Endverbraucher im BesteMusik music shop
10.1.1
Die Gewährleistungsansprüche des Endverbrauchers beschränken sich zunächst auf das Recht zur Nachbesserung oder Ersatzlieferung, wobei die Wahl des Endverbrauchers durch rogershifi.de abgelehnt werden kann, wenn sie nur mit unverhältnismäßigen Kosten möglich ist. Die Nachbesserung gilt mit dem erfolglosen zweiten Versuch als fehlgeschlagen, wenn sich nicht insbesondere aus der Art der Sache oder des Mangels oder den sonstigen Umständen etwas anderes ergibt. Ist die Nacherfüllung fehlgeschlagen oder hat Www.rogershifi.de die Nacherfüllung verweigert oder auf eine vom Endverbraucher gesetzte angemessene Frist nicht reagiert, so ist der Endverbraucher zur Herabsetzung der Vergütung oder zum Rücktritt vom Vertrag berechtigt. Sollte jedoch der angegebene Fehler nicht feststellbar sein, so müssen wir leider die entstandenen Prüfkosten in voller Höhe berechnen, da diese nicht durch die Garantie abgedeckt werden. Des weiteren wird der Endverbraucher darauf hingewiesen, dass kein Gewährleistungsfall vorliegt, wenn das Produkt bei Gefahrübergang die vereinbarte Beschaffenheit hatte. Ein Gewährleistungsfall liegt insbesondere in folgenden Fällen nicht vor:
10.1.2
Die Gewährleistungszeiten sind abhängig vom jeweiligen Produkt.
Die Mindestgewährleistungszeit beträgt 24 Monate.
Bei Geräten mit einer hauseigenen Gewährleistung (Geräte die direkt über rogershifi.de käuflich erworben sind) wenden Sie sich im Servicefall innerhalb der Gewährleistungszeit bitte grundsätzlich nur an uns, da ausschließlich unser Haus die Gewährleistung für Sie erbringen muss. Die Gewährleistungszeiten beträgt 24 Monate.
Unsere Gewährleistung schließt alle Kosten (Material und Arbeitszeit) ein, welche zum Instandsetzten des Gerätes nötig sind, nicht jedoch die Versandkosten.
Bei Gewährleistungsreparaturen zahlt der Käufer die Versandkosten für den Hintransport, wir übernehmen die Versandkosten für den Rücktransport.
Der mangelhafte Liefergegenstand ist rogershifi.de zur Besichtigung bereitzuhalten. Bei Verstoß gegen die vorstehenden Verpflichtungen sind Gewährleistungsansprüche ausgeschlossen. Mängelansprüche bei Gebrauchtwaren (B-Ware) bestehen nicht.
Um die volle BesteMusik Garantie in Anspruch nehmen zu können, senden Sie uns bitte die beigelegte Garantiekarte innerhalb von zwei Wochen korrekt und vollständig ausgefüllt zu. Sie erhalten eine Garantiebestätigung per E-Mail (sofern Sie uns Ihre E-Mail Adresse mitgeteilt haben). Nur wenn die Rückware in der Originalverpackung zurück gesandt wird erweitert* sich die Garantiezeit (*je nach Produkt). Sonst kann nur die gesetzliche Gewährleistung von 24 Monaten berücksichtigt werden. Nachträglich registrierte Produkte erhalten keine Garantieverlängerung mehr.
Während der Garantieperiode brauchen Sie keine Reparaturkosten für Ihr BesteMusik Produkt zu bezahlen. Weitere Ansprüche über die Reparaturkosten hinaus sind jedoch ausgeschlossen. Sollte der Defekt am Produkt durch unsachgemäßen Gebrauch, Fremdeinwirkung oder nicht-autorisierte Modifikationen entstanden sein, sind die Reparaturkosten nicht von der Garantie abgedeckt. Die Garantieperiode beginnt mit Erstverkauf des Produktes durch BesteMusik music shop. Als Nachweis dient der Kaufbeleg, der vorgelegt werden muss. Geben Sie Ihr defektes Produkt in der Originalverpackung mitsamt Innenverpackung ab.
Www.rogershifi.de und BesteMusik schließt die Haftung für Schäden, die durch einfache Fahrlässigkeit verursacht worden sind, aus, sofern diese keine vertragswesentlichen Pflichten, Schäden aus der Verletzung des Lebens, des Körpers oder der Gesundheit oder Garantien betreffen oder Ansprüche nach dem Produkthaftungsgesetz berührt sind.
Bei der Verletzung wesentlicher Vertragspflichten ist die Haftung in Fällen einfacher Fahrlässigkeit auf die Schäden, die in typischer Weise mit dem Vertrag verbunden und vorhersehbar sind, beschränkt. Schadensersatzansprüche aus Verzug oder nachgewiesene Ansprüche auf Aufwendungsersatz gemäß § 284 BGB sind auf 10% des Kaufpreises beschränkt, soweit rogershifi.de oder BesteMusik nicht vorsätzlich oder grob fahrlässig gehandelt hat.
Alle persönlichen Daten werden selbstverständlich vertraulich behandelt.
Listenmäßige Adressdaten nutzt und übermittelt rogershifi.de und BesteMusik ggf. für werbliche Ansprachen seiner vertrauenswürdigen Partnerunternehmen. Selbstverständlich kann der Endverbraucher und Unternehmer der Weitergabe seiner Daten für Werbezwecke jederzeit widersprechen, indem er formlos z.B. Einspruch per Post (Stichwort: Datenschutz, BesteMusik, Loecknitzer Str. 17, 17321 Bergholz) oder per E-Mail (rogers@rogershifi.de) erhebt.
Durch die Bestellung erklärt sich der Kunde mit der Speicherung seiner Daten einverstanden. Er ist jederzeit berechtigt, seine Daten einzusehen und ggf. Angaben verändern bzw. löschen zu lassen. Näher siehe Datenschutz.
Siehe Datenschutz
Dieser Vertrag unterliegt ausschließlich dem Recht der Bundesrepublik Deutschland unter ausdrücklichem Ausschluss des UN-Kaufrechts.
Sofern der Kunde Endverbraucher ist, ist Neubrandenburg; rogershifi.de ist jedoch berechtigt, den Endverbraucher auch an seinem Wohnsitzgericht zu verklagen. Erfüllungsort für Unternehmer ist Neubrandenburg.
Für Endverbraucher und Unternehmer aus anderen EU-Mitgliedsstaaten ist Gerichtsstand und Erfüllungsort ausschließlich Neubrandenburg.
Sind diese AGB ganz oder teilweise nicht Vertragsbestandteil geworden oder unwirksam, so bleibt der Vertrag im Übrigen wirksam. Soweit die Bestimmungen nicht Vertragsbestandteil geworden oder unwirksam sind, richtet sich der Inhalt des Vertrags nach den gesetzlichen Vorschriften. Der Vertrag ist nur dann unwirksam, wenn das Festhalten an ihm auch unter Berücksichtigung der nach den gesetzlichen Vorschriften vorzunehmenden Änderungen eine unzumutbare Härte für eine Vertragspartei darstellen würde.
Siehe Impressum
© 2018 BesteMusik
There are no reviews yet.


source of emotions
 Clearaudio Bestseller 3
25,00 €
Clearaudio Bestseller 3
25,00 €
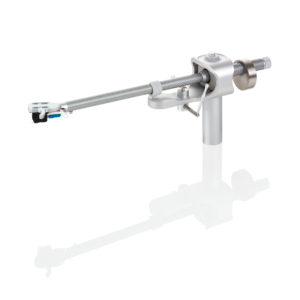 Clearaudio Tonabnahmer
  DVORAK
Reviews